Sewing, quilting, crafting with occasional bits about doing so with a little one and limited time.
Showing posts with label finishes. Show all posts
Thursday, June 7, 2012
Block for Sisters quilt block contest
Fun. And a pain in my bum. I started with a plan and then I could not resist my desire to improv everything. I used almost every scrap of fabric they sent to use for the block- and it seemed like plenty for two! It measures 9.5" square. The reverse looks almost as cool as the front.
Slouch bag finish (+pattern fail)
Over the weekend I received this book from a friend who thought I would love the projects. I do! There are a ton of gorgeous things to make, and I knew the slouch bag would be the one I wanted to start with- and I had the perfect fabric! I have this organic dahlia print from Harmony Art (called Evelyn) in my stash, and I love the print for a big bag.
I cut out my fabric and started sewing, but as I got to the part about adding the top bands and handles...it wasn't making sense. Turns out, this book is sorely in need of an errata page. The directions do not work. In addition, the handles would be way too small (and I am a stick-armed lady) and just attached to the band and not the bag itself. That seems less than sturdy to me, so I re-cut the handles to be 3 inches longer and then jerry-rigged the whole business to finish up the bag.
I love the way it turned out, though it was a challenge to figure out each step as I put it together. I also added a liner because I made it out of cotton and not linen, and I like the clean look without seams inside. Plus, this adds a pop of color to a simple bag. Lots of slouch and gathers, which is new and fun for me. I can't wait to gift it to my friend!

I love the way it turned out, though it was a challenge to figure out each step as I put it together. I also added a liner because I made it out of cotton and not linen, and I like the clean look without seams inside. Plus, this adds a pop of color to a simple bag. Lots of slouch and gathers, which is new and fun for me. I can't wait to gift it to my friend!

Tuesday, April 17, 2012
Zakka Style project- zakka pincushion
I was sent an eBook to review for Zakka Style by Rashida Coleman-Hale, and it coincided nicely with the Zakka Style Sew Along hosted by Lindsey and Amy.


I wanted to start with the Zig Zag Tote from the book, but I was not sufficiently motivated 2 weeks ago! This pincushion project was perfect for me- I whipped it up in an hour or so, and am happy with the cute result. Of course, I made a few materials revisions, as the reader is urged to.
Instead of linen I used double of my natural muslin I have on hand, and instead of rik rak or crochet lace (which are fantastic looking in the sample) I used a small bit of coordinating ribbon. I had this wacky fish bead as well, so I added that in lieu of a covered button.
Yay for improvising! I did have some cotton tape, so I drew a little leaf pattern in ink to echo my Parisville damask dot print.
The fabric choices and trim make a lot of difference. I could see myself making many more versions for gifts and giving them all a unique personality for each recipient. I also did use Ayumi's tip for using a glue stick to secure the ribbon trim and the cotton tape- genius! Much better than pinning.
This book is very well thought out. I had no idea when I started in, but it is a collaborative book, so it has projects from many different people in it, all just along the Zakka aesthetic spectrum. I am really excited to sew more projects from the book. There are a huge range of them, from quilts to softies with their own pillow pocket (my next earmarked project) and many in between. This is a great book for gift ideas, and there are many different levels of time commitment and difficulty. I have my top favorites to try:
1. Sweet Sugar Cookie Sack
2. Little Pocket Pillowcase (the one with the softie)
3. Nesting Boxes
The directions for the pincushion were very clear and simple, and I did find myself flipping to the front page a lot to refer to the photo, though that is less important the less attached you are to making yours look like the book sample. I think the best part of this sew along is seeing all the variations people are making to the project- it really makes them all sing their own tune.
Thanks to C&T publishing for sending me the book to review as part of the Creative Troupe! I will be using this book for many projects to come. (P.S. - If you are a blogger, check out the Creative Troupe program. Nice perks.)
Tuesday, April 10, 2012
Block for Portland Modern Quilt Guild challenge
I winged it all, except measuring the green for the background. I was heavily influenced by Alissa Haight Carlton, especially this quilt, which has been on my to-make list for a while.
Monday, April 9, 2012
Progress! Sparkle Punch quilt top completed! And a bunny!
Finally just laid put my Sparkle Punch quilt on the floor (I have no design board) and then pieced it together. Happiness. The stars are Taza from Free Spirit, the background Kona dark grey.
And I made a little bunny for my son for Easter, very last minute on Saturday, freehanded the pattern, but it was influenced by Revoluzza's cute bunnies. Done up with my Birch leftovers.
Linking this Half Square Triangle project up with Canoe Ridge Creations...
Wednesday, March 21, 2012
Thanks to many, and a new mini Petra-dactyl quilt
It has been a while since I have blogged, and since I have sewn much. But I do have a lot to share, and I'll try not to overburden this post! I have some thanks to parcel out first.
I recently received this beautiful fat eights bundle of Peacock Lane from a giveaway at Very Berry Handmade, from the UK shop M is for Make. I have no solid plans yet for it, but I better make it lovely, since the designer of the fabric is in my quilt guild.
I also won this adorable wall hanging from Nellie's Niceties. The center of the Dresden is embroidered with a woodland scene, and the whole bit is hand quilted. I am lucky to have it! I would not make anything like this myself, since it is beyond the scope of my skills!
Lastly, I won 6 one yard cuts of the new Parson Grey Curious Nature line. I am so psyched to work with these, I am thinking of attacking a hexagon quilt finally, because they would look fabulous in one. Now to get motivated to do the cutting. These I won from the Free Spirit blog, which is always having low-entry giveaways that are very generous. I recently won an entire fat quarter bundle of Taza from them too.
Whew! Now that I have caught up with all that, some sewing to show. I made another mini quilt for a birthday gift for a one year old. We call her Petradactyl, because her name is Petra and my husband thinks she sounds like a pteradactyl when she yells. (You know, because we all know firsthand what a pteradactyl sounds like.) And since I have been experimenting with reverse applique lately, I had to try it out again.
I embroidered the nickname in two different colors and fonts to emphasize her name (thanks to my sister for the lesson and the floss!) and then quilted some air current-type lines in white to fill in background.
I used some of my fat eights of Heirloom for the patchwork, which was very randomly cut and assembled. I laid some natural muslin over it, and reverse appliqued it, then echo quilted the shape in variegated yellow and purple.
Bound in Heirloom scraps, and off it goes to Petra! The finished mini measures about 32.5" x 22.5".
The back is some pieces I had in my stash, the cute larger pieces being FQs I received from The Intrepid Thread a while back, though I have no idea about designer or line. The binding doesn't necessarily coordinate, but I had to use Heirloom again! It will likely hang on the wall anyway, so I doubt it will be an issue.
So happy with it!
I recently received this beautiful fat eights bundle of Peacock Lane from a giveaway at Very Berry Handmade, from the UK shop M is for Make. I have no solid plans yet for it, but I better make it lovely, since the designer of the fabric is in my quilt guild.
I also won this adorable wall hanging from Nellie's Niceties. The center of the Dresden is embroidered with a woodland scene, and the whole bit is hand quilted. I am lucky to have it! I would not make anything like this myself, since it is beyond the scope of my skills!
Lastly, I won 6 one yard cuts of the new Parson Grey Curious Nature line. I am so psyched to work with these, I am thinking of attacking a hexagon quilt finally, because they would look fabulous in one. Now to get motivated to do the cutting. These I won from the Free Spirit blog, which is always having low-entry giveaways that are very generous. I recently won an entire fat quarter bundle of Taza from them too.
Whew! Now that I have caught up with all that, some sewing to show. I made another mini quilt for a birthday gift for a one year old. We call her Petradactyl, because her name is Petra and my husband thinks she sounds like a pteradactyl when she yells. (You know, because we all know firsthand what a pteradactyl sounds like.) And since I have been experimenting with reverse applique lately, I had to try it out again.
I embroidered the nickname in two different colors and fonts to emphasize her name (thanks to my sister for the lesson and the floss!) and then quilted some air current-type lines in white to fill in background.
I used some of my fat eights of Heirloom for the patchwork, which was very randomly cut and assembled. I laid some natural muslin over it, and reverse appliqued it, then echo quilted the shape in variegated yellow and purple.
Bound in Heirloom scraps, and off it goes to Petra! The finished mini measures about 32.5" x 22.5".
The back is some pieces I had in my stash, the cute larger pieces being FQs I received from The Intrepid Thread a while back, though I have no idea about designer or line. The binding doesn't necessarily coordinate, but I had to use Heirloom again! It will likely hang on the wall anyway, so I doubt it will be an issue.
So happy with it!
Sunday, March 4, 2012
Mini quilt challenge entry- Shaaarrk!
I made this mini quilt in response to the Modern Mini Quilt Challenge from Ellison Lane Quilts. It measures 19" x 21.5" and is super cool.

I have wanted to try making a reverse applique quilt with patchwork ever since I saw this amazing quilt from Dan at Piece and Press. I knew it would take many tries to pull off an amazing piece like this, so I wanted to get trying! I love sharks and worked in shark research for a summer in college, so I knew what animal I had to make. They are as old as dinosaurs, so the connection was complete.
I made the grey patchwork square first, and loved the way it looked all on its own, but I forged on. I took out my shark books and found some pictures I liked, then drew them only as lines to see how well they would translate to patchwork. I picked this shape because I thought the plain side view was not graphically interesting enough. It is a little played out, in other words.
I loved the shark after I cut it out, but it was clear I needed to add the eye and the mouth and nose lines for the applique to read as a shark. So this is really a skill builder for me. I almost called in my sister but resisted.
Then I quilted on some wave lines to look like water, which I am pretty pleased with. I tried variegated blue thread thinking it would look cool, but it just got lost in the blue fabric, so white it is.
Overall, good lessons, fun time making it, and a nice piece for my shark loving household. Case in point: my toddler identifies the size of his bites relative to shark species and their size,
i.e. a lemon shark bite < tiger shark bite < megalodon bite.
Yes, we are bio (and shark) nerds. Love it.
Linking up...
Thursday, February 9, 2012
I Heart February post- a preview of my first tutorial!
I could not resist making a Valentine's Day related project, especially after I spied a fun linky and contest over at Pink Chalk Studio's blog, and a contest for a tutorial over at Sew Mama Sew. So I whipped up this heart hanging. I hope I will get my first tutorial written for it later this week. Edited to add: here is the link for the tutorial!
First off, I have been doing some reading on Zen and also on architecture- I know, bear with me. The book was called The Architecture of Happiness by Alain de Botton. In the very last bit, he writes about the Japanese concept of beauty and transience called wabi-sabi. (With apologies to any Japanese readers or scholars- I will misconstrue this, but only to the best of my abilities and intentions). The idea is that our ideas of beauty lie largely in perfection, while wabi-sabi is more about appreciating the beauty in asymmetry, organic, irregular objects or activities. Thus, the idea for this project was born and executed.
The whole aesthetic of this project is to embrace the raw, rough parts of fabric and sewing and take a break from the measured, perfect angles that quilting often takes. For me, it is a psychological break from my usual sewing room thinking.
First off, I have been doing some reading on Zen and also on architecture- I know, bear with me. The book was called The Architecture of Happiness by Alain de Botton. In the very last bit, he writes about the Japanese concept of beauty and transience called wabi-sabi. (With apologies to any Japanese readers or scholars- I will misconstrue this, but only to the best of my abilities and intentions). The idea is that our ideas of beauty lie largely in perfection, while wabi-sabi is more about appreciating the beauty in asymmetry, organic, irregular objects or activities. Thus, the idea for this project was born and executed.
The whole aesthetic of this project is to embrace the raw, rough parts of fabric and sewing and take a break from the measured, perfect angles that quilting often takes. For me, it is a psychological break from my usual sewing room thinking.
It is a lot of sketchy sewing without much regard to linearity or spacing, though it is hard not to think of those things after sewing so long.
I laid down the strips with raw edges and sewed two lines down each pieced strip to secure them down. Then I reverse appliqued the heart shape on natural muslin.
This is one of the particularly rough sewed areas, and you may be just able to see the strips under the muslin layer.
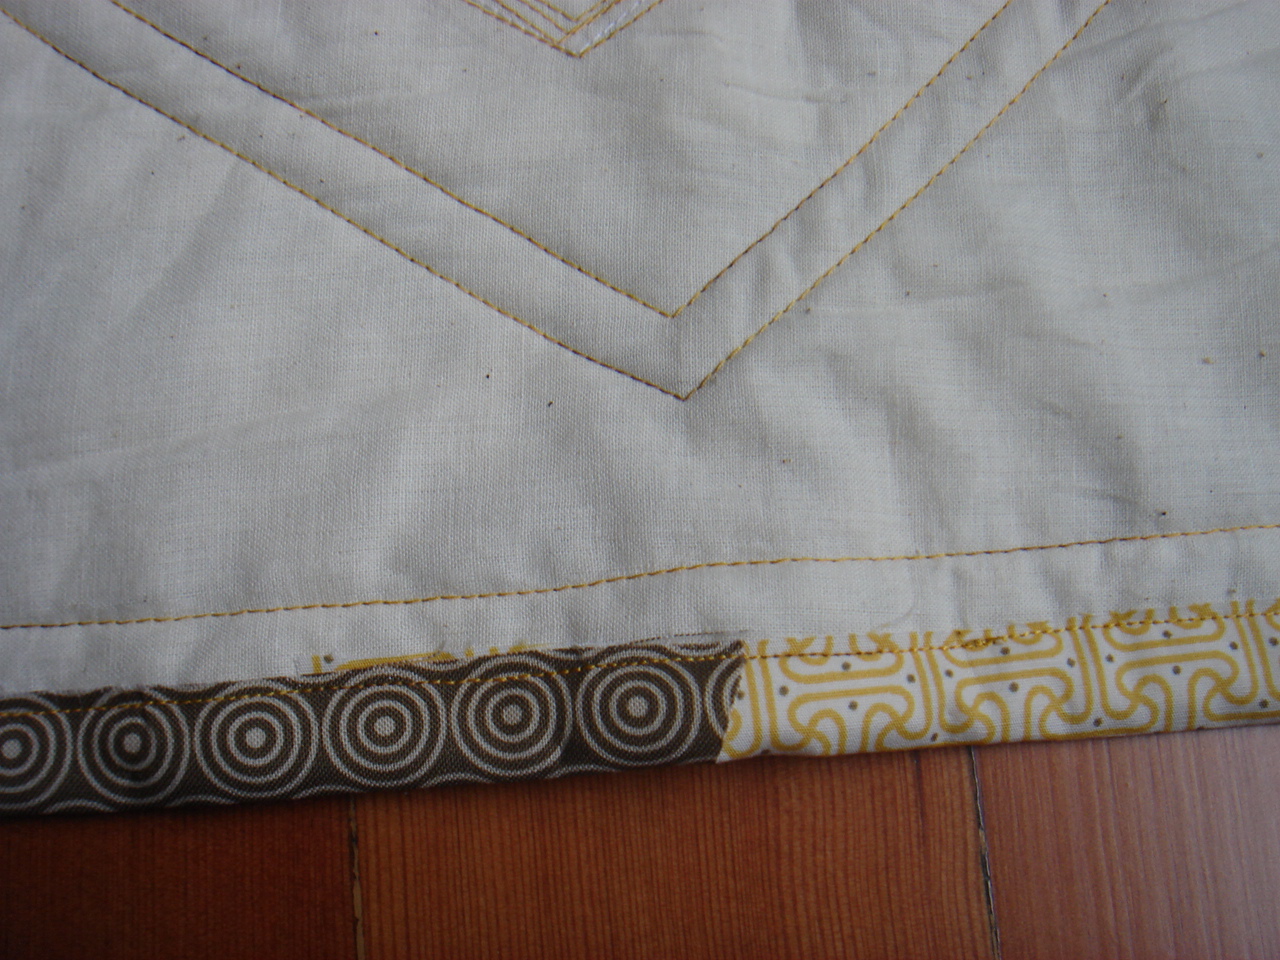
I only did a single 1.5" strip for binding and left raw edges on both sides, as well as at this joint of the binding.
The top edge, where I did some organic lines but did not like the way they looked enough to continue.
A closer view of the reverse applique stitches, in variegated thread.
Thanks for stopping by!
Linking to Pink Chalk...http://pinkchalkstudio.com/blog/2012/01/31/i-heart-february/
And Canoe Ridge Creations...
Sunday, January 29, 2012
Zig Zag baby quilt
So I find myself tonight listening to the monitor, waiting for my son to fall asleep, my husband downstairs studying, and me without much to do. My sewing stuff is in the basement and it is cold down there, and apparently my machine is loud and the sound really carries. Plus, I like music on when I am sewing, and Kanye coming through the vents is not conducive to my husband's concentration. He suggested I write a blog post, but I have not much photogenic progress going on, just plugging along piecing my Sparkle Punch quilt...
Ah, yes! I never wrote a post about a quilt I made for my friend and co-worker's baby! And it is a missing link on my newly created Quilt Gallery page on this blog. A topic- success!
Back at my old, pre-baby job as a vet tech in a specialty surgery practice, I made an excellent friend who was having a baby. Well, this was before I got pregnant with my baby, and I was jealous. Three months later, I got over that (because I got a positive test, and the good hormones were raging) and I decided to make her a baby quilt.
I wanted to make a zig zag quilt, and to make things complicated I asked our coworkers if they wanted to each contribute a bit of fabric to make it, and then we would present it as a gift from all of us. My only guidelines were to get fabric in her nursery colors, brown and green. Then I got the fabric, and things got complicated. It was hard to make things look nice with that eclectic mix! Here I am trying out a layout- all one fabric, or all mixed up?
All mixed up, of course! Readers will know that I do love a crazy, wonky, lots-going-on quilt. And that I am really not skilled at taking good photos of my quilts! See below as evidence...
But you get the idea. I hope. I quilted in two different colors following the zig zag pattern, but not evenly spacing them, and doubled up some very close to the adjacent line. The binding was my first print binding- I had no other non-brown in any appreciable amount. But I love the look of it. The back is simply the brown on white print from the blocks. And I did not measure it, but is that really important? It's baby crib sized.
Can you believe I am a scientist at heart, who works in exactitude and vigilant record-keeping? Naw, me neither. This is my fun time hobby!
Ah, yes! I never wrote a post about a quilt I made for my friend and co-worker's baby! And it is a missing link on my newly created Quilt Gallery page on this blog. A topic- success!
Back at my old, pre-baby job as a vet tech in a specialty surgery practice, I made an excellent friend who was having a baby. Well, this was before I got pregnant with my baby, and I was jealous. Three months later, I got over that (because I got a positive test, and the good hormones were raging) and I decided to make her a baby quilt.
I wanted to make a zig zag quilt, and to make things complicated I asked our coworkers if they wanted to each contribute a bit of fabric to make it, and then we would present it as a gift from all of us. My only guidelines were to get fabric in her nursery colors, brown and green. Then I got the fabric, and things got complicated. It was hard to make things look nice with that eclectic mix! Here I am trying out a layout- all one fabric, or all mixed up?
All mixed up, of course! Readers will know that I do love a crazy, wonky, lots-going-on quilt. And that I am really not skilled at taking good photos of my quilts! See below as evidence...
But you get the idea. I hope. I quilted in two different colors following the zig zag pattern, but not evenly spacing them, and doubled up some very close to the adjacent line. The binding was my first print binding- I had no other non-brown in any appreciable amount. But I love the look of it. The back is simply the brown on white print from the blocks. And I did not measure it, but is that really important? It's baby crib sized.
Can you believe I am a scientist at heart, who works in exactitude and vigilant record-keeping? Naw, me neither. This is my fun time hobby!
Monday, January 9, 2012
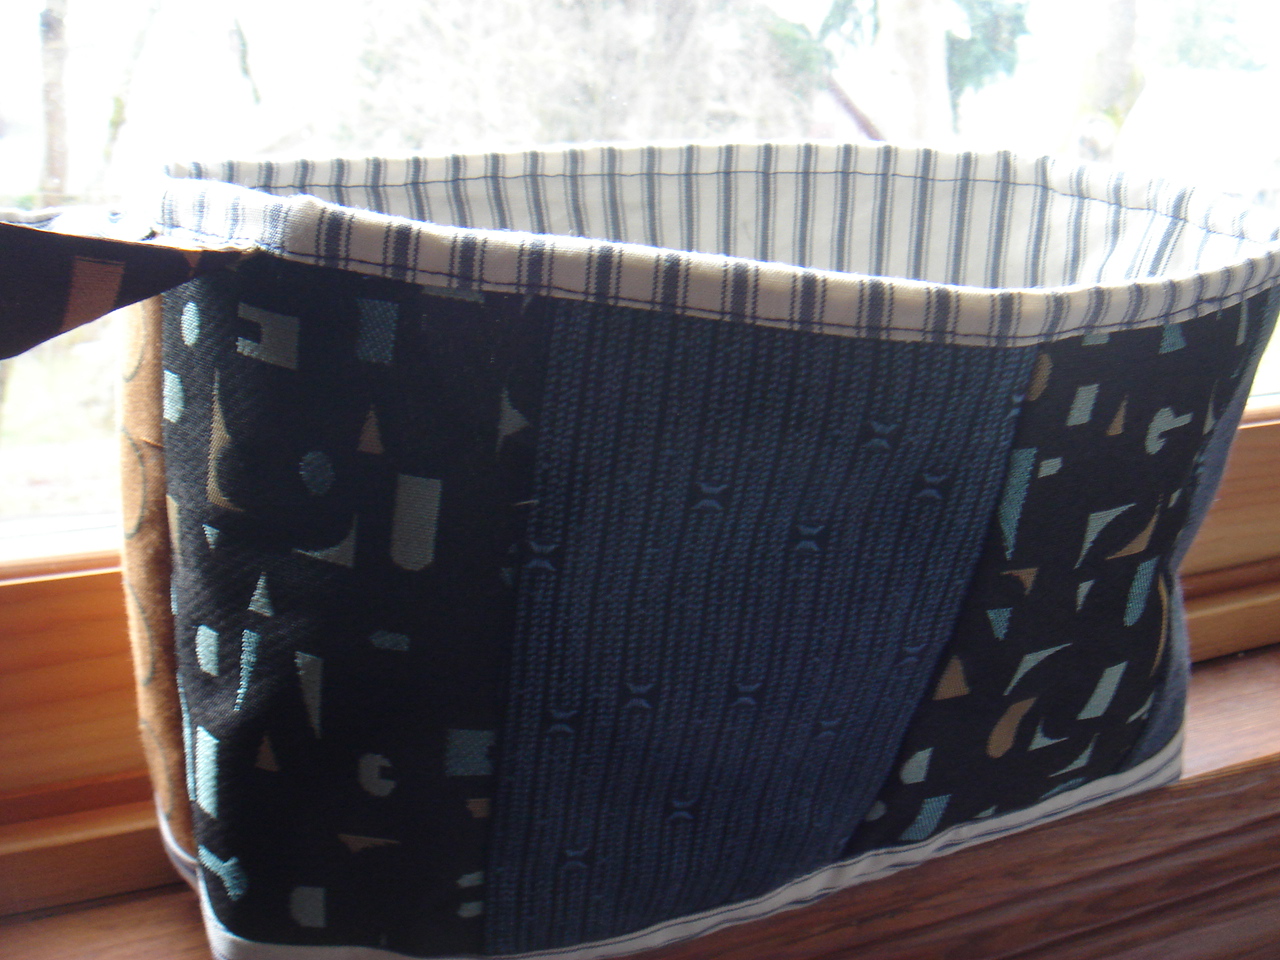
Fabric basket to store letters (the ABC kind)
I made a fabric basket! I have had this bookmarked forever as a to-do project, but I got the kick in the pants I needed because my son needed something to store felt letters in from a gift. I used the tutorial from Pink Penguin, and it would have been even faster had I actually looked at the photos!
See, I sew in the basement now without a computer, so Saturday night I wrote down the tutorial and then went downstairs to sew. I had not picked out fabrics yet, so from that point until having the exterior and lining done only took me about 2 hours! So far, so much excellent-ness.
Cut to today, when I sewed the lining to the exterior and realized I attached the handles to the inside of the exterior. Rookie mistake. So I took out the trusty seam ripper, ripped and flipped, then finished it up in another hour, I think. Not too bad, all in all.
I used fabrics salvaged from samples my husband's old architecture firm was trashing, and the lining is some fabric from my stash I was gifted. So I am no help there! I highly suggest design firms for small bit of cool heavier weight fabrics- they get rid of them all the time!
See, I sew in the basement now without a computer, so Saturday night I wrote down the tutorial and then went downstairs to sew. I had not picked out fabrics yet, so from that point until having the exterior and lining done only took me about 2 hours! So far, so much excellent-ness.
Cut to today, when I sewed the lining to the exterior and realized I attached the handles to the inside of the exterior. Rookie mistake. So I took out the trusty seam ripper, ripped and flipped, then finished it up in another hour, I think. Not too bad, all in all.
I used fabrics salvaged from samples my husband's old architecture firm was trashing, and the lining is some fabric from my stash I was gifted. So I am no help there! I highly suggest design firms for small bit of cool heavier weight fabrics- they get rid of them all the time!
Linking up...
Subscribe to:
Posts (Atom)